Wait, what is the Film gate?
The film gate in cameras is a metal plate positioned in front of the photographic film that has the dual purpose of holding the film in place and letting the light through.
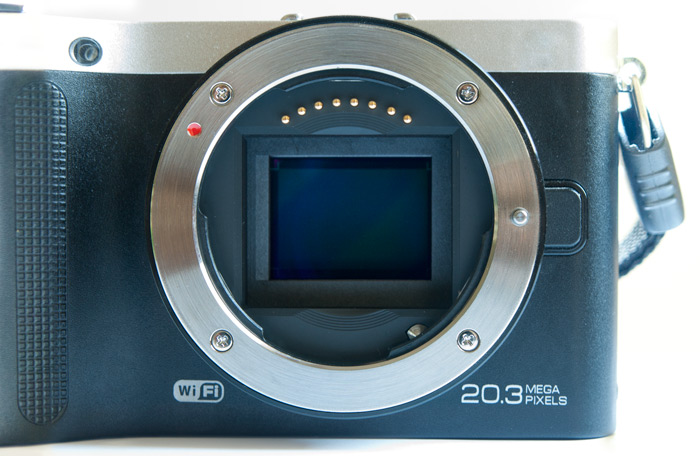
In real cameras the film passes between two thin metal plates: the film back and the film gate.
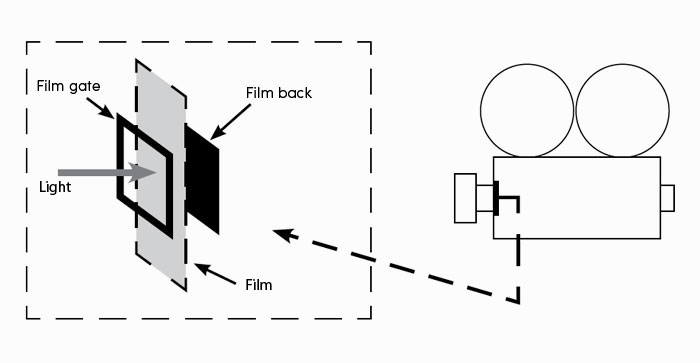
Drawing of the film back and film gate of a camera.
The film back is behind the film and has the same height as the total height of the film, including the parts of the film that are needed to make the film move throught the metal plates; it is measured in millimetres. In the standard 35mm film for SLR cameras the film back measures 35mm in height.
The film gate holds the film from the front. Since the film gate is a frame, the inner part is empty and will let the light that exposes the film (or the digital sensor) through. In a common 35mm film, the exposed part will be 36mm wide and 24mm high.
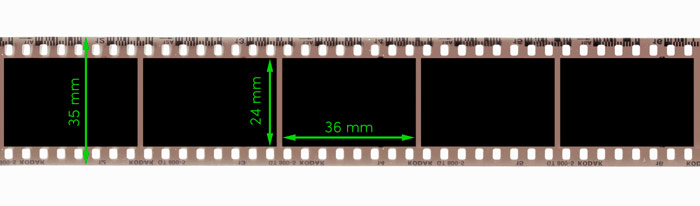
Dimensions of a standard 35mm film.
This is the region that we are going to simulate in maya and not the film back, because it makes sense to render only what is exposed.
Why is knowing the size of the film gate important?
Film gate, Angle of view and Focal length are variables that are related and interdependant to each other.
We know what the film gate is;
the angle of view is the width of the visual cone;
the focal length is the focal length of the lens you want to simulate and it is expressed in mm.
Knowing the size of the "virtual film" (the film gate) that we are using is really important because it affects the angle of view. As a matter of fact by fixing the focal length of the lens and varying the size of the sensor (or of the film gate) the angle of view that we will be able to shoot will be radically different.
In other words with a full frame SLR (namely one that has the sensor size equal to the standard 35mm film: 36mm x 24mm), a lens with a focal length of 28mm will have an angle of view of 65°, while with an APS-C DSLR, like the Canon Eos 700D - EOS Rebel T5i - (equipped with a sensor that is one third smaller), there will be an angle of view of 46°. It would have been the same as to mounting a 42mm lens on a full frame camera. This is the famous crop factor.
Controlling the film gate means being able to control the angle of view through the choice of the focal length of the lens rather than using the value of the angle of view, a much more natural thing for any photographer.
The problem
Imagine now that you have to put an object created in 3D in a real shot. To be able to match its perspective we have to know the size of the sensor and the focal length of the camera that was used to take the photo. From the metadata of the image we are able to retrieve brand, model and focal length used to shoot the picture.To know the size of the sensor you just need to search in the database of dpreview.com.
Maybe you are thinking that everything you'll have to do now is inserting the retrieved values in the focal length and camera aperture attributes on the film back section of the camera's attribute editor.
For the focal length you are right. For the camera aperture it's not that simple.
First of all we are going to find in this section an attribute that might fool us, the film gate. This is just a list of camera format presets used in the film industry. The true size of the film gate is determined only by the two values of camera aperture.
The second problem is understanding the unit of measurement that maya uses for this attribute. The default values are 1.417 for the width and 0.945 for the height.
UPDATE: since Maya 2015, cameras finally have two different fields to control the film gate dimensions. The first one has the unit of measurement expressed as inches, the second one as centimeters. This is much more clear than before!
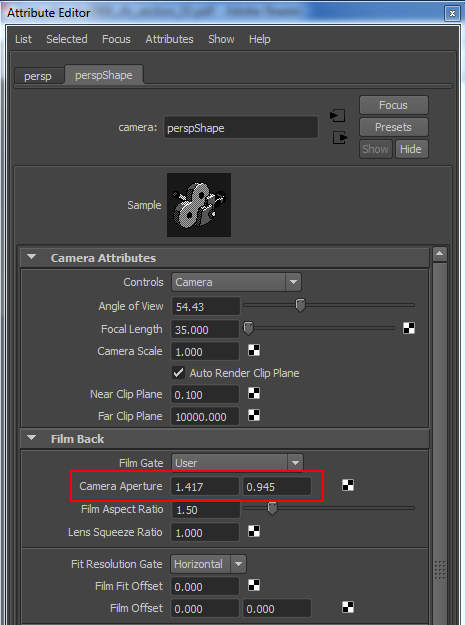
The film back section of the camera in maya.
At first these values look random and maya doesn't help us because it doesn't show the unit of measurement after the value.
It would be natural to think that the unit of measurement is the one that we have set in our preferences, in my case, centimetres. Unfortunately it's not like this.
The unit of measurement of camera aperture in maya is always inches.
So to obtain the correspondent value in centimetres we have to mutiply our values by 2.54 (1 inch = 2.54 cm):
1.417 x 1.54 = 3.6cm = 36mm
0.945 x 2.54 = 2.4cm 24mm
We now find out that the default values, reproduce the size of the standard 35mm film.
It makes sense now: it makes less sense though that maya developers haven't specified anywhere the use of the american customary unite of measure instead of the metrical measure.
At this point we have understood the trick to obtain the values of our personalized film gate/sensor. To insert the correct values in the camera aperture fields, we have to make the opposite operation:
Knowing that 1 cm = 0.39 inch, we will have:
Camera Aperture W = sensore width x 0.39
Camera Aperture H = sensor height x 0.39
For example, the Canon Eos 700D (EOS Rebel T5i) has a film gate of 22.4mm x 14.9mm. Its values of camera aperture in maya will be 0.870 and 0.581.
Eventually we will set the correct focal length from the photo's metadata in the focal length attribute of our maya camera and we will have a matching perspective between the 3D scene and the real image.